Moodle Resources
| Site: | GBHEM Online Learning |
| Course: | GBHEM Online Learning |
| Book: | Moodle Resources |
| Printed by: | |
| Date: | Wednesday, April 29, 2026, 9:09 PM |
1. Finding Your Way Around
Watch this video, produced by Mary Cooch, Moodle Community Educator for Moodle HQ, for a generic introduction to navigating Moodle on a desktop or laptop computer.
Download and print GBHEM Moodle Workplace Navigation (PDF file) for navigation directions and screenshots specific to the GBHEM Moodle site.
This is a multi-page resource. Use the links in the "Table of contents" (on the right or below, depending on your screen size) or click on the arrows on the right or left of the text to go to the next or previous page.
2. View and Edit Your User Profile
Creating a user profile in is an important aspect of participation in the online community.
Your profile is your online identity throughout the site. Creating or updating your profile is one of the first things you should do after you log in.
How to view and edit your profile
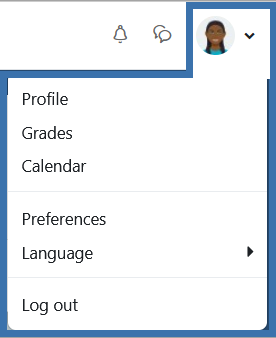 Click on your profile image or the small down arrow next to your image (top right) to open the user menu.
- In the drop-down menu, click on Profile.
- On your profile page, click on Edit profile. You can now update your profile.
Your profile is not course-specific. It will display for members of each course in which you are enrolled on this site.
Profiles are not public; they are visible only to people with accounts on this site.
2.1. General Settings
- Your name and email address are tied to the registration system and can't be changed by you in Moodle. If you need something updated, please contact the COS Office at cos@gbhem.org.
- Email display – The default setting is “Visible to course participants.” Click on the down arrow to open the drop-down menu for other options. Note: Hiding your email address does not prevent Moodle from sending you emails; it prevents other Moodle users from seeing your email address.
- City/town – Type the name of the city or town in which you live. Add the state postal code abbreviation.
- Country – The country will already be selected. You can update it if necessary.
- Time zone – The default time zone is Eastern Time. You may change this to your own time zone. Setting the time zone will convert time-related messages (such as assignment deadlines) from Eastern Time to the time in the zone you select. The timezone options are listed by Country/City.
- Eastern time – use America/New York
- Central time – use America/Chicago, or America/Indiana/Indianapolis if you live in Indiana
- Mountain time – use America/Denver, or America/Phoenix if you live in Arizona
- Pacific time – use America/Los Angeles
- Alaska – use America/Anchorage
- Hawaii – use Pacific/Honolulu
- International – use a country/city combination close to your location
- Description – This is the heart of your profile.
- Please write a brief (about 100 words) informative description or biographical sketch that helps others in your course(s) get to know you as we build an online learning community. This will display on your profile page and be visible to everyone in your course(s).
- The text editor works much like a word processing program with options for formatting text.
- Click on the icon at the top left corner of the text editor toolbar to expand it and display more tools. Click on that icon again to hide the additional tools.
- You can copy text from elsewhere and paste it into the text editor if you are writing offline.
- Click on the question mark icon to view a tip or in-context help in a pop-up box.
2.2. User Picture
This is another key aspect of your profile.Prepare your image:
- Image – Use a good head shot photo of yourself. It can be formal or informal.
- Format – Images should be in JPG or PNG format.
- Size – Reduce the size and resolution of your image to no more than 600x600 pixels and no more than 300dpi before you upload the image. Large images are subject to removal. All images will be cropped to a square shape and resized to 100x100 pixels for display in discussion posts and elsewhere.
- If you don't have an image editor, you can use the free Image Resizer online at https://imageresizer.com/. There is nothing to download; just upload your image and select your options on that website (link will open in a new browser tab or window).
Video produced by Lance Eaton, Director of Digital Pedagogy, College Unbound.
Upload options – use A or B
-
File picker method – In the “New picture” field, click on the “Add” icon in the upper left corner or on the arrow in the center fo the field to open the File picker.
- When the File picker opens, click on Upload a file.
- Click the Browse or Choose File button to select a file from your computer. When you find it, click on it to select it and then click the “Open” button. The file name will then display next to the Browse or Choose File button.
- Leave the Save as field blank unless you need to change the image's file name when it is saved.
- Your name will display in the Author field; leave it there since you are the person uploading the file.
- In the Choose license field, select one of the options. Keep the default All rights reserved unless you know the image has a Creative Commons license or is a public domain image. Make sure you understand these licenses before using them. An image you find using Google search does not necessarily meet the legal definition of “public domain.”
- Click the Upload this file button.
- Drag and drop method – Drag the image from your computer's file system and drop it on the arrow in the “New picture” field.
Picture description – Type a short description in the Picture description field that will display if the image can't be displayed or seen.
2.3. Save Your Changes
Other – Fill in any of the other optional fields, if you choose.
Save your work – When finished editing, click on the Update profile button at the bottom of the page.
3. Using the Text Editor
Video produced by Mary Cooch, Moodle Community Educator for Moodle HQ
4. Using the Discussion Forums
Video produced by Lance Eaton, Director of Digital Pedagogy, College Unbound.
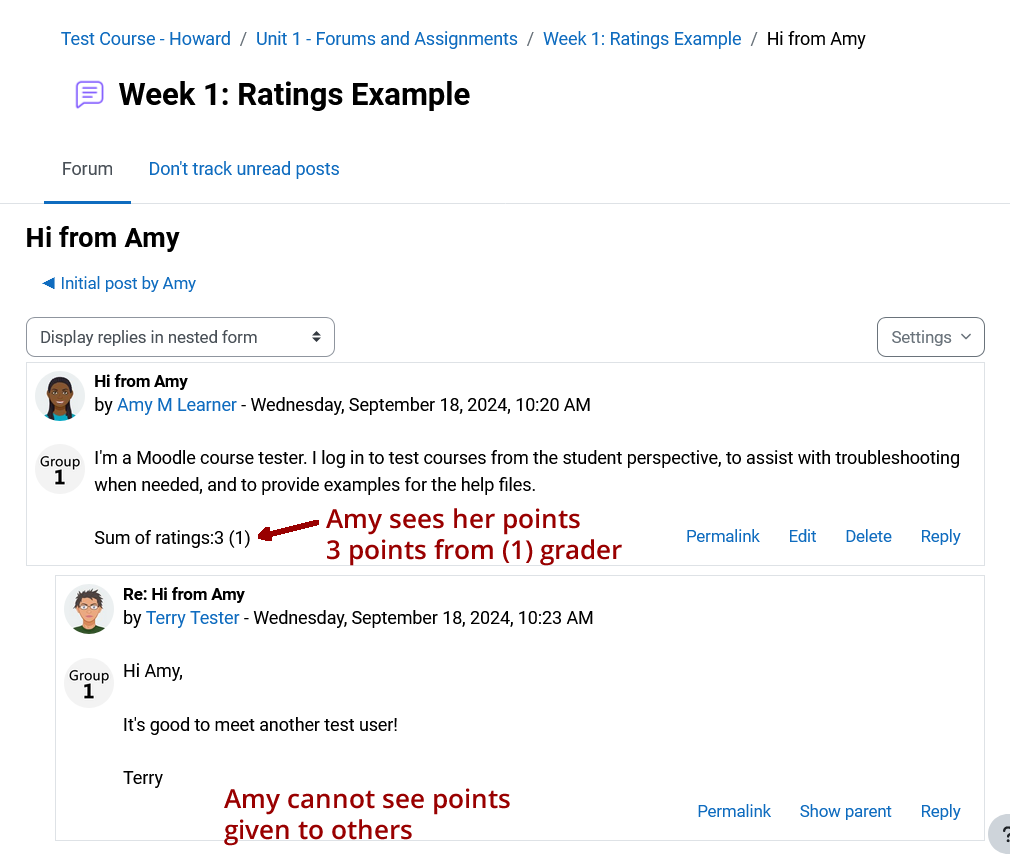
4.1. Forum Feedback: Ratings
Points will display below your post and in the gradebook.
Facilitator feedback may be given individually in the forum as a reply to your post, or as general feedback via a message to your group, or to the class as a whole via the Announcements.
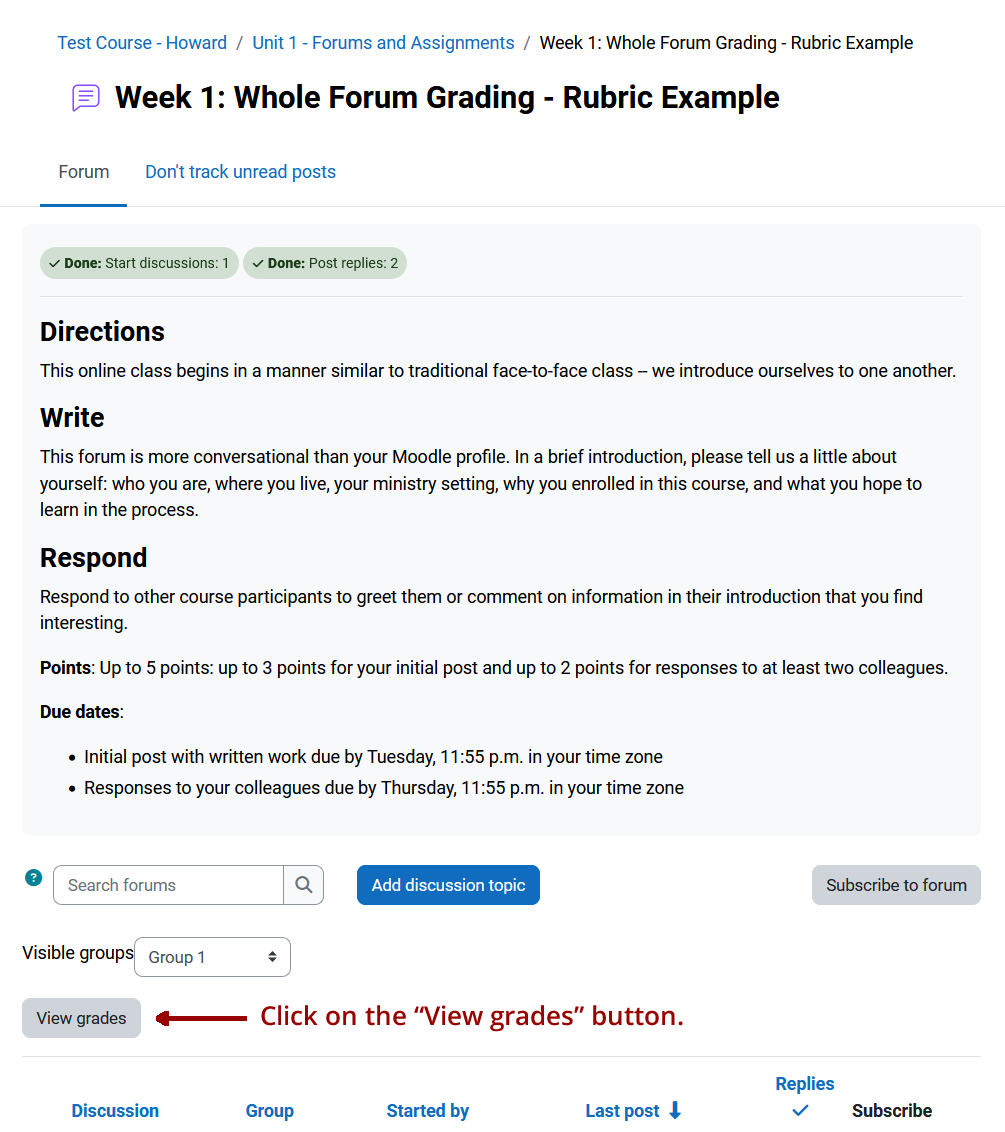
4.2. Forum Feedback: Whole Forum Grading
Whole Forum Grading allows facilitators to assess each person’s forum posts as a whole rather than applying a rating to each individual post.
To see your points and facilitator feedback, click on the "View grades" button below the forum directions and above the beginning of the list of posts.
An overlay window will open with points and feedback.
The total number of points and graded earned for all posts in the forum will display at the top right, followed by feedback for your initial post and your responses to colleagues.
Use the vertical scroll bar on the right to scroll down as needed.
Click and drag on the lower right corner of the feedback area to enlarge it if the feedback is longer than one line.
The screenshot below illustrates the overlay window when a rubric is used. If a rubric is not used, the overlay will look a bit different, but the same principles apply.
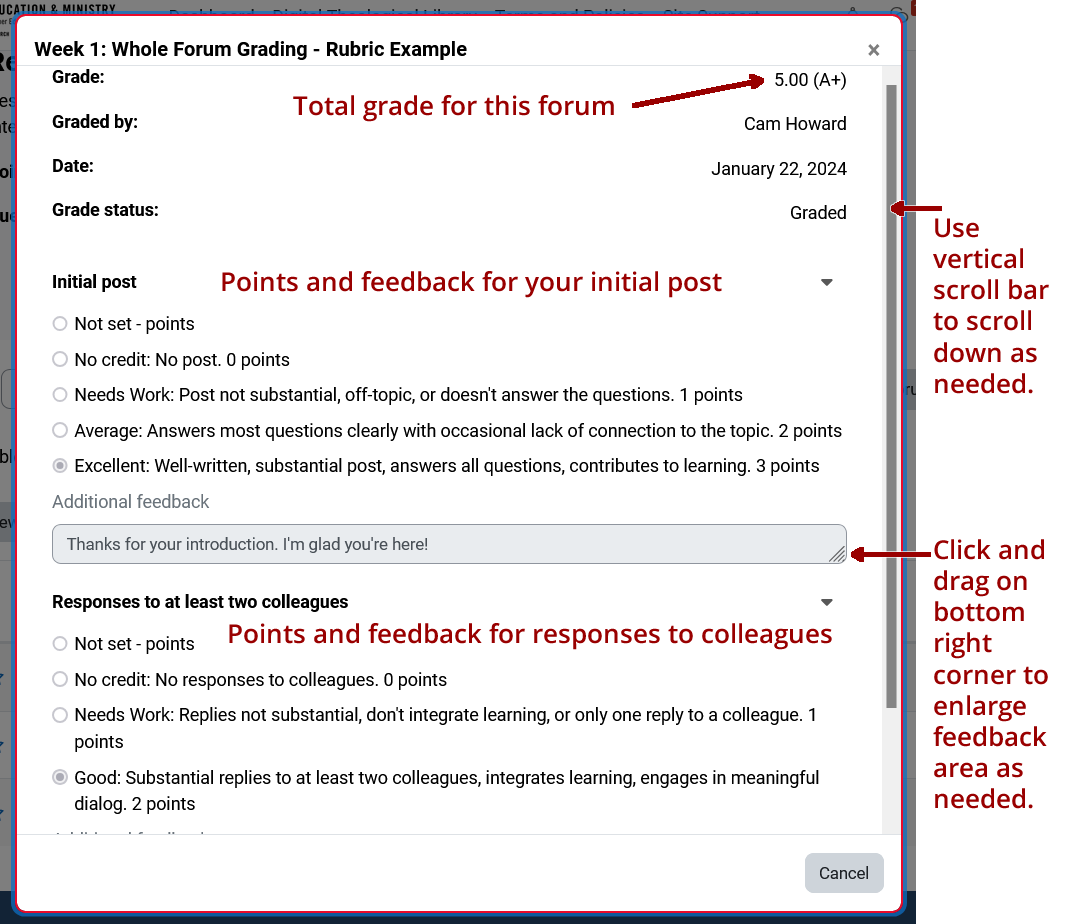
The grade will also be added to the gradebook, but the feedback will only display here, in the forum itself.
5. Submitting Assignments
Video produced by Lance Eaton, Director of Digital Pedagogy, College Unbound.
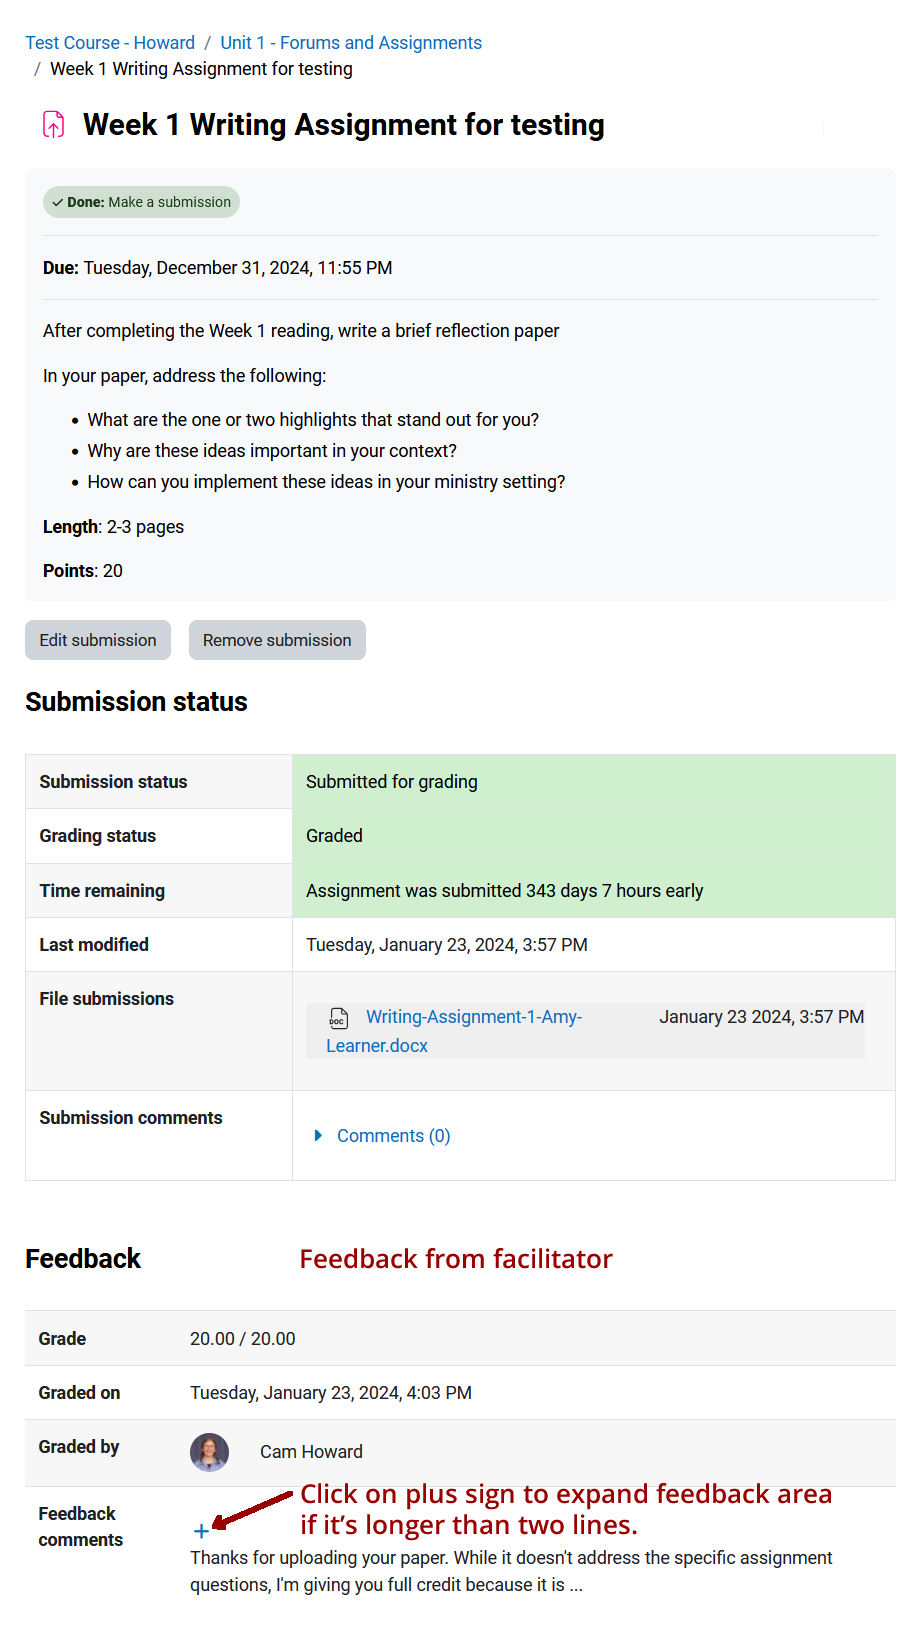
5.1. Assignment Feedback
Feedback from the facilitator and the grade earned for an Assignment learning activity (which is submitted only to the facilitator) is displayed on the assignment page, below the directions and submission status.
Both the feedback and the grade are also added to the Moodle gradebook.
6. Notification Preferences
Video produced by Lance Eaton, Director of Digital Pedagogy, College Unbound.
7. Moodle Messages
Faculty, staff, and students may send and receive private messages to one another via a Moodle Message.
Message settings
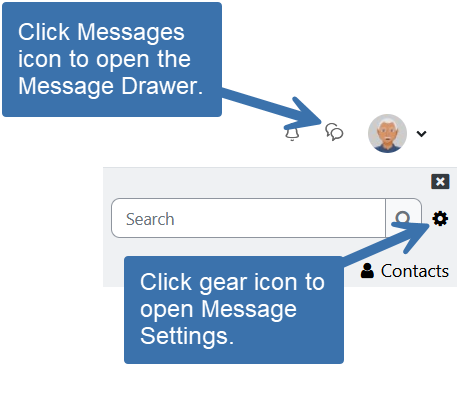 Click on the Messages icon in the Navigation Bar to open the Message Drawer
 - If you click on the messages icon and nothing happens, it may be a setting in your browser and clearing the browser cache generally helps.
- Hold down the Shift key, click on the "Reload" or "Refresh" icon in the browser, and then release the Shift key. When the page reloads, click on the messages icon.
- Click on the gear icon to open the Settings options where you can set you privacy settings, notification preferences, and the option to press enter to send messages.
7.1. Sending messages
 Click on the Messages icon in the Navigation Bar to open the Message Drawer.
- Type a name in the Search field and click the search icon or press enter or click on Contacts to see your contacts list.
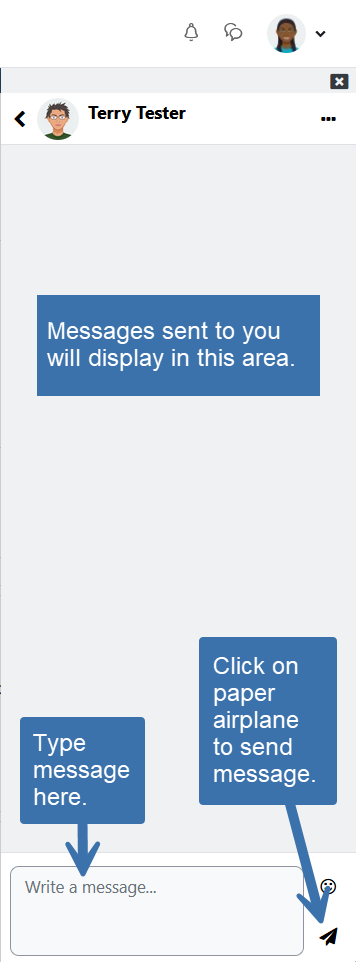 When the name of the person displays, click on the name.
- At the bottom of the screen, type a message in the message field.
- Click on the paper airplane icon to send the message.
Optional: If you want to add the person to your contacts list, click on their name again and click on the “Add to contacts” button. A request will be sent to the person. If they accept, you will be added to each other's contacts.
You can also send a message to someone from their Moodle profile.
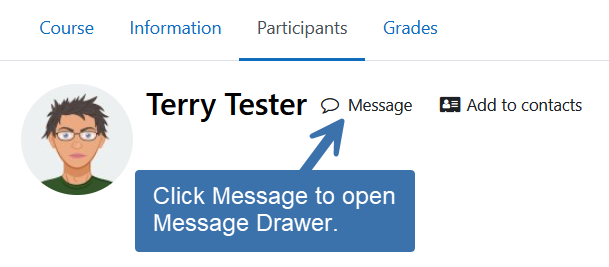 Click on Participants in the Course Menu.
- Click on the name of the person you want to contact to view their profile.
- At the top of the screen, next to the person's name, click on “Message.”
- When the Message Drawer opens, type a message in the message field.
- Click on the paper airplane icon to send the message.
7.2. Reading messages
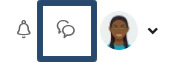
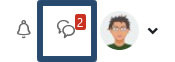 New messages are highlighted with a number next to the messages icon.
- Click on the Messages icon to read the messages.
Messages may also be sent to you via email, depending on your preferences. To reply to a message, you must log into Moodle, you cannot reply via email.
8. Email from the Discussion Forums
Why am I getting so much mail?
Forum posts are sent to you via email when you are subscribed to a forum.
By default, you are automatically subscribed to a forum when you post in it.
Your options
If you don't want to be auto-subscribed to a particular forum:
- Click on "Advanced" just below the "Message" field, after you compose your post.
- Uncheck the "Discussion subscription" checkbox that will now be visible below the "Message" field.
- Scroll down and click on the "Post to forum" button.
If you don't want to be auto-subscribed to any forums when you post in them, you can change that in your preferences. Here's how:
- Click on your name in the upper right corner of the screen to open the User Menu and then click on "Preferences."
- On the "Preferences" page, look in the "User account" block and click on "Forum preferences."
- On the "Forum preferences" page click on the drop-down for "Forum auto-subscribe" and change it to "No, don't automatically subscribe me to the forum discussions."
- While you are there, you may also want to set "Forum tracking" to "Yes, highlight new posts for me" so Moodle will highlight anything you haven't read yet each time you log in.
- When finished with your forum preferences, click on the "Save changes" button.
If you want to remain subscribed and receive a daily digest instead of a single email for each post, you can change that in your preferences. Here's how:
- Click on your name in the upper right corner of the screen to open the User Menu and then click on "Preferences."
- On the "Preferences" page, look in the "User account" block and click on "Forum preferences."
- On the "Forum preferences" page click on the drop-down for "Email digest type" and chose among the options. Click on the question mark in a blue circle for a description of each option.
- When finished with your forum preferences, click on the "Save changes" button.
Beyond the auto-subscribe option, you can also subscribe and unsubscribe from most topics and forums at any time.
To unsubscribe from a forum as a whole:
- Go to the forum from which you are receiving email.
- Click on the blue gear icon in the upper right corner of the forum page, just to the right of the forum's title.
- A drop-down menu will open. If you are subscribed, click on "Unsubscribe from this forum." If you are not subscribed and want to be, click on "Subscribe to this forum."
To unsubscribe from one or more individual topics in a forum:
- Go to the forum and look at the list of discussion topics your colleagues have created.
- Look for the subscription toggle on the far right side of the row that contains the topic you want to change.
- If the subscription toggle is off (positioned to the left and gray), that means you are not subscribed. Click the toggle to subscribe.
- If the subscription toggle is on (positioned to the right with a blue background), that means you are subscribed. Click the toggle to unsubscribe.
- This enables you to receive email from some topics in a forum and not others.
You will always receive email from the facilitator in the "Announcements" forum. You can't unsubscribe from that one.
9. Replying to Email Sent via Moodle
When anyone on Moodle contacts you via Moodle Message or if you are subscribed to the course forums, Moodle sends an email to you on behalf of the person writing the original message. However, you cannot reply to the person by simply clicking on "reply" in the email message.
Here's what's happening and why.
Software that sends email on behalf of someone else is often used for spam mail and email providers are getting stricter about whether or not they accept that email.
To help ensure delivery of Moodle Messages and forum posts, the GBHEM Moodle site sends email using a "From" address of "noreply@gbhem.org." This enables Moodle to use the domain name rather than the original sender's email address. This lowers the risk of getting blocked.
This process works well for ensuring you receive Moodle Messages and forum posts. The downside comes when you try to reply to the messages via email. When you click on "Reply" in the email, the email gets sent to the "noreply" address which is like a dead letter box. It doesn't get sent to the intended recipient.
Please be sure to log into Moodle and reply to the person directly via Moodle Message or in the forum.
Each message will include a link to the message or forum in the email. You can just click on that link, log in, and be in the right place to respond.